What is Helm?
It was one of the first Kubernetes package managers. It essentially helps users in packaging up all of the resources needed for a Kubernetes deployment.
For many software vendors and projects, Helm is a popular installation method for installing resources on your Kubernetes cluster.
Package management is not a new concept, if you are a Linux user, you are familiar with APT, YUM/RPM, etc, which are essential for installing and uninstalling software. Similarly, we have Homebrew for Mac and Chocolately for Windows.

History of Helm
At the first Kubecon in 2015, Helm was first introduced. Helm was created by Deis, a company dedicated to helping the Kubernetes ecosystem that was later acquired by Microsoft.
In June 2018, Helm was promoted from a Kubernetes subproject to a full-fledged CNCF project. Helm established a top-level governing body, and several projects were incorporated into the Helm project.
In April 2020, Helm graduated as a CNCF project.
Why Helm?
As the Kubernetes platform and ecosystem grew, deploying only one Kubernetes configuration file (a single YAML) was no longer the case. There may be multiple clusters to deploy to and resources to orchestrate within a Kubernetes cluster. As the number of YAMLs grew, so did the question of where to store them. Helm is here to help with these issues.
If there are multiple Kubernetes clusters with different configurations, Helm should be used. Many software vendors and open source projects offer Helm repositories or charts to users as a way for them to install applications in the Kubernetes cluster.
Helm charts
Helm uses the Charts packaging format. Helm charts are a collection of YAML files. Helm charts, like other convention-based package manager formats, have a directory structure/tree. These charts are either kept in a public or private repository, known as Helm Chart Repository.
Charts are what are installed and uninstalled in Kubernetes clusters, and a chart that is running is referred to as a release. At last, a Helm Chart is a template that executes to convert Chart definitions to Kubernetes manifests.
When we create a Helm chart, we should include a version number that follows the semantic versioning. Other charts are referred to as dependencies on Helm charts.
weather-helm
|-- Chart.yaml
|-- charts
|-- templates
|   |-- NOTES.txt
|   |-- _helpers.tpl
|   |-- deployment.yaml
|   |-- hpa.yaml
|   |-- ingress.yaml
|   |-- service.yaml
|   |-- serviceaccount.yaml
|   `-- tests
|       `-- test-connection.yaml
`-- values.yaml
Let's look at each directory and file individually.
charts/: Various charts might be included in the directory (which we call sub-charts).Chart.yaml: This section contains the chart's description, such asapiVersion,name, andversion. Each chart should have its own version number and adhere to the Semantic Versioning guidelines, but there is no such rule forapiVersion.values.yaml: As the name implies, it has something to do with values, and you are correct. It is one of the template's most important files. This file contains the chart's default values. Users can also override these values.templates/: Helm relies heavily on templates. The template files are kept in the Template Directory. When Helm evaluates a chart, it runs the template rendering engine on all files in thetemplates/directory. The information from the templates is then collected and sent to the Kubernetes cluster. Helm uses Go Templating when conditional logic needs to be included in the templates.
If you take a look at the templates/ directory, you'll notice a few files already there.
NOTES.txt: Your chart's "help text." When your users run the helm install command, this will be displayed to them.deployment.yaml: A basic manifest for creating a Kubernetes deployment.service.yaml: A basic manifest for creating a service endpoint for your deployment._helpers.tpl: A place to put template helpers that you can re-use throughout the chart.
We can actually create our own NOTES.txt and _helpers.tpl.
Helm Templating functions
Helm's resource files are templated using Go templates. While Go includes a number of built-in functions, Helm has added several of the new ones.
include and required are the two special templating functions.
includefunction: We can bring in another template and also pass the output of one template to another templating function by using the include function. Example:value: {{ include "template1" . | lower | quote }}This is an example of a template named template1 being included and the result being in lowercase and quoted.
requiredfunction: This function declares that a specific value is required for that template to be rendered, if it is not provided, an error message defined by the user will be printed. Example:value: {{ required "A valid .Values.foo entry required!" .Values.foo}}
Differences between Helm v2 & v3
Helm 1.0 was released in February 2016, followed by Helm 2.0 in November, and Helm 3.0 in November 2019. Since the project's 2016 launch, it has expanded quickly and improved steadily. Helm 3.0 is much easier to use and smarter.
Let's compare helm 2.0 and helm 3.0 to see the changes that were made.

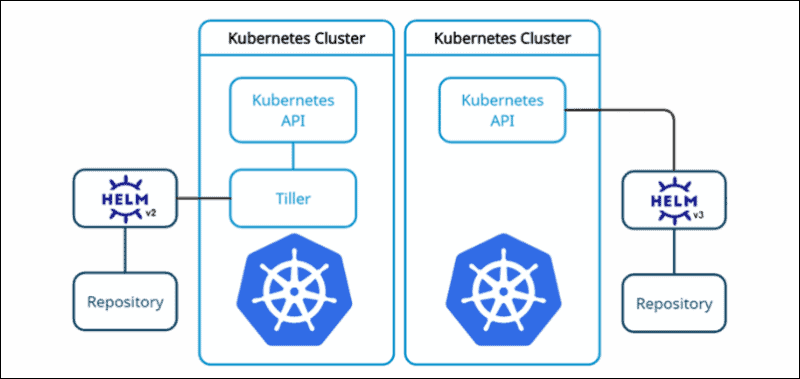
Helm has a command line interface (CLI) through which we can perform actions. When Helm 2.0 was released, Kubernetes lacked features such as Role Based Access Control (RBAC) and Custom Resource Definitions (CRDs), so an additional component had to be installed in the Kuebrnetes cluster to allow Helm to work.
So, whenever you wanted to perform a helm-specific operation, your helm-client communicated with Tiller, which was running on a different server. Tiller then communicated with Kubernetes and proceeded to take the action you requested. Thus, Tiller acted as a middleman. Tiller has the power to do anything in the cluster, which raised many security concerns. As in the Kubernetes cluster, the user now has access to do whatever they want.
Tiller was removed from Helm 3.0 because it was no longer necessary due to the inclusion of RBAC and CRDs in Kubernetes, which reduced the security concerns it raised.
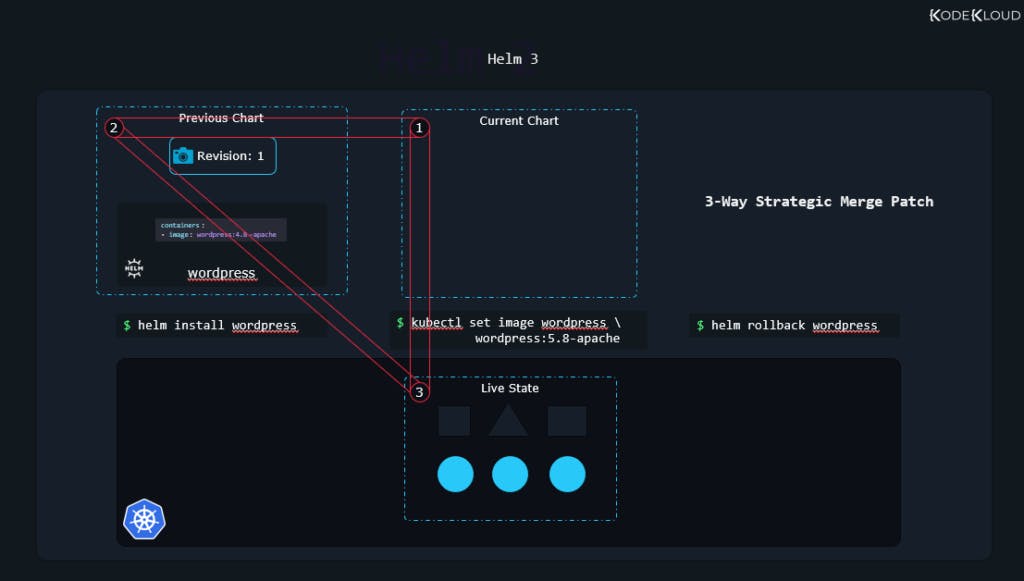
3-way Strategic Merge Patches:
- On rollbacks/upgrades, only 2-way merge patch (old chart → new chart)
- Helm 3 considers the old chart → live state → new chart.

… and more!
A step-by-step guide for making and deploying a Helm chart.
Prerequisites
- Access to a CLI
- kubernetes cluster installed and configured.
- Helm installed and configured.
Note: To confirm Helm installed properly, run
which helmin the terminal. The output should return a path to Helm.
Creating the Helm Chart
Step 1: Create a New Helm Chart
$ helm create weather-helm
That is it and the basic Helm Chart skeleton with the name weather-helm is ready.
Step 2: Using the tree command, list the chart structure:
$ tree weather-helm
Every configuration in the Helm Chart ecosystem is defined as YAML configuration.
Creating a Helm chart involves creating the chart itself, configuring the image pull policy, and specifying additional information in the values.yaml file.
Step 3: Wouldn't it be nice if you could see the service.yaml, deployment.yaml with its actual values before running the helm install command?
Yes you can do that with the helm template command.
$ helm template weather-helm
You cannot run the above command from within the specified directory, so exit and then execute the command.
When you run the above command, you should get service.yaml, deployment.yaml and test-connection.yaml with actual values. It renders the templates locally by replacing all placeholders with their actual values.
Step 4: There is one more sanitary command lint provided by helm which you could run to identify possible issues forehand.
$ helm lint weather-helm
Output:
==> Linting weather-helm
[INFO] Chart.yaml: icon is recommended

1 chart(s) linted, 0 chart(s) failed
Step 5: The next check which we are going to do is -dry-run. This allows developer to test its configuration before running the final install command
Use the following -dry-run command to verify your Helm Chart.
$ helm install weather-helm --debug --dry-run weather-helm
If there is something wrong with your Helm chart configuration then it will going to prompt you immediately.
Push vs. Install
- Pushing a chart will only push a chart to a Helm repository (and automatically package it)
- Installing a chart will create a brand new release from a Helm chart.
Helm install
Helm charts can be installed using helm install command by one of several methods:
- A chart repository (helm install stable/foo)
- A local chart archive (helm install foo foo-0.1.1.tgz)
- An unpacked chart directory (helm install foo path/to/foo)
- A full URL (helm install foo example.com/charts/foo-1.2.3.tgz)
Step 1: Let's then install the chart.
$ helm install weather weather-helm
NAME: weather
LAST DEPLOYED: Sat Nov 26 18:51:17 2022
NAMESPACE: default
STATUS: deployed
REVISION: 1
Let's break down the command because it might be a little confusing for you if you're doing it for the first time.
During the installation command, we used two different names -
weather: This is a release name for the Helm chart, otherwise, the helm will generate its own release name, so we assigned this name.
weather-helm: It is the actual chart name that we created in the previous step.
Step 2: Verifying the helm install
$ helm list -a
NAME    NAMESPACE       REVISION        UPDATED                                 STATUS          CHART                   APP VERSION
weather default         1               2022-11-26 18:51:17.346245631 +0530 IST deployed        weather-helm-0.1.0      1.16.0
Let's do some cross verification using kubectl commands also, so that we can make sure helm has done its work.
$ kubectl get all
NAME                                        READY   STATUS             RESTARTS   AGE
pod/weather-weather-helm-6b944bb4b4-gqh9q   0/1     InvalidImageName   0          2m3s

NAME                           TYPE        CLUSTER-IP      EXTERNAL-IP   PORT(S)    AGE
service/kubernetes             ClusterIP   10.96.0.1       <none>        443/TCP    63d
service/weather-weather-helm   ClusterIP   10.106.46.243   <none>        8080/TCP   2m3s

NAME                                   READY   UP-TO-DATE   AVAILABLE   AGE
deployment.apps/weather-weather-helm   0/1     1            0           2m3s

NAME                                              DESIRED   CURRENT   READY   AGE
replicaset.apps/weather-weather-helm-6b944bb4b4   1         1         0       2m3s
Step 3: We have now installed the first helm chart for your application. You can now access the application and put it to the test. Using the curl command with the specified port number.
Step 4: Upgrade the helm release
There is one more feature of Helm Chart which is helm upgrade. It makes it easy for devops to release the new version of application.
Lets take the same weather release and update its replicaCount from 1 to 2
But before we need to update the replicaCount. First we need to udpate the version in Chart.yaml from 0.1.0 to 0.1.1
apiVersion: v2
name: weather
description: A Helm chart for Kubernetes
type: application
version: 0.1.1
appVersion: 1.16.0
And upgrading the value of replicaCount to 2
Now run the following command
$ helm upgrade weather .
Verify by running helm list -a and kubectl get deployment
Step 5: Rollback Helm release
In the above step we upgraded the Helm chart release from version 1 to version 2.
So let's see rollback feature of the Helm Chart.
$ helm rollback weather 1
You will see that we have successfully rolled back the release to the previous version. But one interesting thing about Helm is, it still updates the REVISION to 3
To confirm that we have actually rolled back our Helm Chart release, lets run some kubectl commands.
$ kubectl get deployments
Now it is confirmed that we now have only one replica running for "weather" deployments.
Step 6: Delete Helm release
Wouldn't it be nice if you need to run only one command to delete your Helm release and you do not have to do anything else.
$ helm delete weather
Visit Helm doc's to learn more about it!
